
With custom trigger tracking, you can design your own behavior-based emails based on your contacts’ digital behavior. In this guide, we’ll show you how to set up the four different types of custom triggers so you can tailor your messages exactly as you want.
Find custom triggers in the menu
Click the ” Integrations ” menu item, then “List Integrations.” Next, click ” Edit Integration ” next to “Tracking Integrations.”
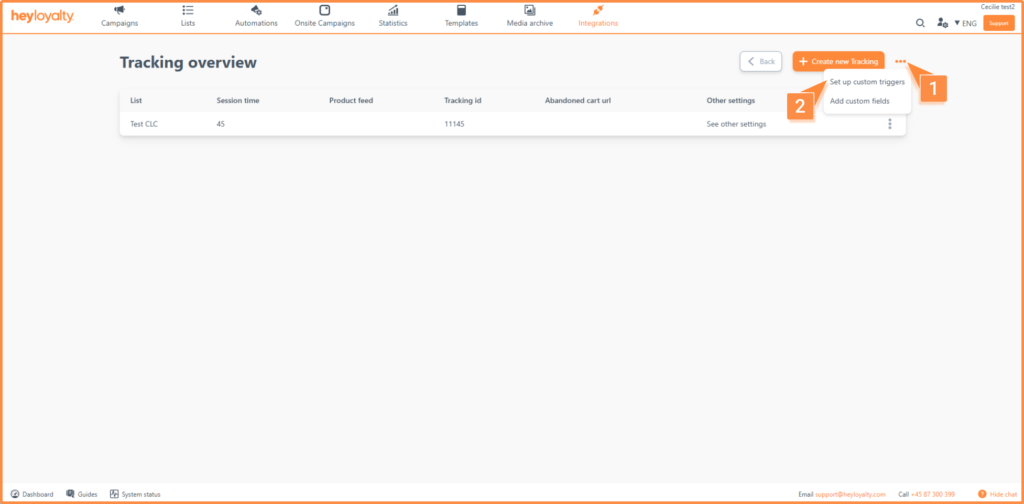
Click the three dots and select ” Set up custom triggers ” in the upper-right corner, then tap ” New custom trigger.”
Create a customer trigger
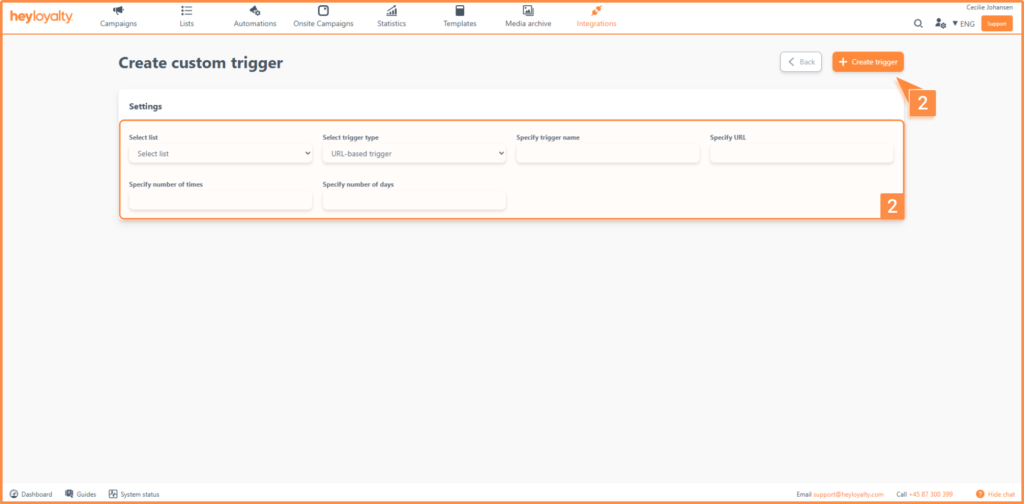
When you create a new custom trigger, select the following settings:
- Select list: Select the list to which the customer trigger should be associated
- Select trigger type: What should trigger the automation flow? Read about the types below:
- URL-based trigger: Triggers when the contact interacts with a specific URL.
- Product Visit: Triggers when the user views a specific product.
- Product Purchase: Triggers when a specific product is purchased.
- Products viewed in a session: Triggers when a certain number of products are viewed in a single session.
- Extended product trigger: Respond to product feed data that changes in a specific way based on a specific action
- URL contains trigger: Respond when the contact interacts with a URL that contains that word.
- Purchased in category – exact path: Trigger when a contact has purchased a product in that specific category.
- Purchased in category – contains: Triggers when the contact has purchased a product in a category whose category path contains the specified text.
Read below to learn how to set up the various triggers.
Set up a URL-based trigger
This trigger is activated when a member visits a specific URL a certain number of times within a certain number of days. For example, it can be used to target contacts who visit a specific landing page 5 times within 7 days.
Please fill in the following fields:
- Enter the trigger name: You’ll use this name when you create the trigger in Automationflow. Choose a name that you’ll easily recognize.
- Enter URL: Enter the specific URL that the trigger should handle.
- Specify the number of times: How many times the member must have visited the URL.
- Specify the number of days: Over how many days the visits should have taken place.
Click ” Create Trigger” once you’ve filled in the fields.
Set up a Product Visit trigger
This trigger is activated if a contact has viewed a specific product a certain number of times within a certain number of days. For example, use it to send a discount code when a member has viewed a product 4 times in 5 days.
Please fill in the following fields:
- Enter a trigger name: Use a unique name that you’ll recognize in Automation.
- Specify product ID: Enter the product ID of the product that the trigger is supposed to handle.
- Specify the number of times: How many times the contact should have viewed the product.
- Specify the number of days: Over how many days the visits should have taken place.
Click ” Create Trigger.”
Set up a Product Purchase Trigger
With this trigger, you can follow up on your contacts’ purchases and create effective service emails that drive additional sales. For example, you can send an email x days after a purchase with recommendations for similar products or a prompt to reorder.
Please fill in the following fields:
- Enter a trigger name: Use a unique name that you’ll recognize in Automation.
- Specify product ID: Enter the product ID of the product that the trigger is supposed to handle.
- Specify the number of days since: How long should elapse between the purchase and the trigger being activated?
Click ” Create Trigger.”
Set up a “Products Viewed in Session” trigger
This trigger is activated when a contact has viewed a specific number of products in a single session—for example, 5 products during a single visit.
Please fill in the following fields:
- Enter a trigger name: Use a unique name that you’ll recognize in Automation.
- Number viewed per session: The number of products the member must have viewed during the session.
Click ” Create Trigger.”
Set Up an Advanced Product Trigger
This trigger is activated when a contact has viewed, added to cart, purchased, or performed all actions on a product with a specific value a specific number of times over a specific number of days
Please fill in the following fields
- Enter a trigger name: Use a unique name that you’ll recognize in Automation.
- Product feed field: Select the product feed field associated with the list
- Review all field values: Set this to “Yes” if the field value is not important. Set this to “No” if the field must have a specific value, and enter the value in the ” Specify field value” field.
- Action: Here, you select the action the switch must perform to trigger the automation flow.
- Specify the number of days since: How long should elapse between the purchase and the trigger being activated?
Click ” Create Trigger.”
Set Up an Advanced Product Trigger
This trigger is activated when a contact visits a URL containing the text you specified in the ” Specify URL” field a certain number of times within a certain number of days.
Please fill in the following fields
- Enter a trigger name: Use a unique name that you’ll recognize in Automation.
- Enter URL: Enter the text that the URL must contain for the visit to be recorded.
- Specify the number of times: Specify how many times the contact should visit a URL that contains the specified text.
- Enter the number of days: Specify the number of days over which the visits should be spread.
Click ” Create Trigger.”
Setup purchased in the “Exact Path” trigger category
This trigger is activated when a contact has purchased a product in that specific category.
Please fill in the following fields
- Enter a trigger name: Use a unique name that you’ll recognize in Automation.
- Specify category: Enter the exact path the visitor should have taken on your website. Heyloyalty retrieves the data from tracking; if it isn’t found there, it will retrieve the data from the product feed. The path must be written exactly as it appears in your data; for example:
shoes > women’s shoes > high heels.
Click ” Create Trigger.”
Setup purchased in category – contains trigger
This trigger is activated when a contact has purchased a product that contains part of the category name. For example, “shoes”; in this case, the trigger will fire if the contact visits categories named “women’s shoes,” “men’s shoes,” etc.
Please fill in the following fields
- Enter a trigger name: Use a unique name that you’ll recognize in Automation.
- Specify category: Enter what the category should contain. We’ll use the data we can find in the tracking system as a starting point; if the category isn’t in the tracking system, it will be in your product feed.
Click ” Create Trigger.”
You’re ready to use your custom triggers in automation flows
You have now been introduced to how to set up various custom triggers that allow you to trigger actions based on your contacts’ behavior across URL visits, product views, purchases, categories, and product feed data. The next step is to select the trigger in your automation flow and build the flow that will send the right message at the right time.
Use unique and recognizable names for your triggers so you can easily find them again in Automationflow. This way, you can work more effectively with your flows and create emails that match each contact’s current interests and actions.