


An automation flow is a feature that can automatically send one or more emails or text messages to a single recipient based on a specific action.
We recommend that Heyloyalty accounts use this feature, as it can automate your marketing efforts.
An automation flow can include the following actions:
- Send emails
- Send text messages
- Organize contacts into different groups
- Add conditions to determine whether the contact should continue in the flow
- Add delays between actions
- Perform member actions, such as updating fields or moving a contact
As mentioned, the flow is triggered by an action. Below are some examples of the actions that can trigger it:
- A member is added to or removed from the list.
- A specific date condition has been met—for example, 10 days after a specific field has been updated.
- A specific change is made to a member’s field—for example, the “permissions” field is changed to a different value.
- If you have a premium license, automations can also be sent based on tracking behavior
In this guide, we’ll show you how to create an automation flow.
Step 1: Automation Flow Settings
To create an automation flow, click the ” Automations” menu item. This will display an overview of your automation flows.
To create a new flow , click the “Create New Automation” button in the right-hand corner.
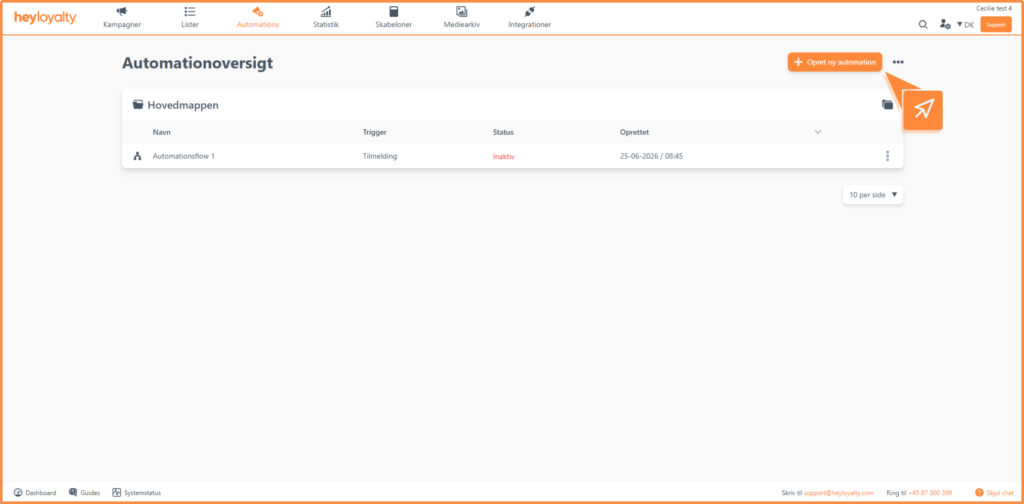
First, select “Automation Flow,” and then click ” Create Automation Flow.”
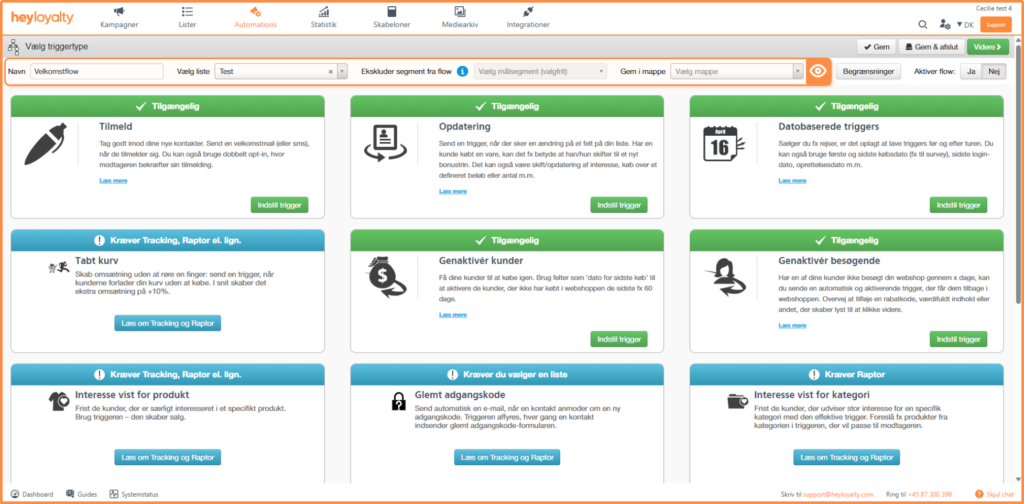
Now you need to configure the general settings for the automation flow.
- Name: Enter an internal name for the automation flow.
- Select list: Select the list to which the automation flow should be linked and that should trigger it.
- Exclude segment from flow: Select a segment to exclude from emails and text messages in this flow. Heyloyalty checks the segment before each send and automatically excludes the contacts included in the segment.
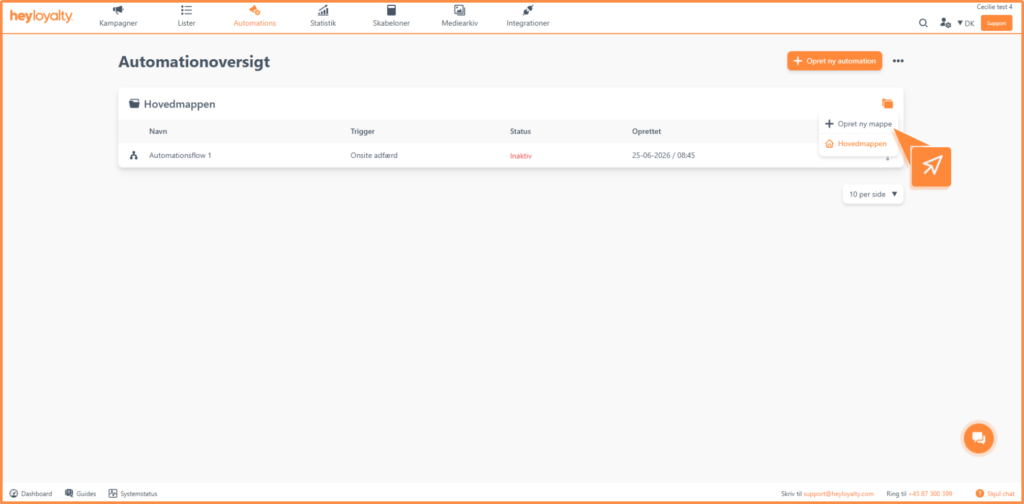
- Save to folder: If you have many automation flows, we recommend that you save the flow to a folder. This makes it easier to find the automation flow again. If no folders are displayed, you must first create a folder. You can do this from the automation overview.
Step 2: Select a trigger
Select the Trigger Basic license
Once you’ve selected a list, choose the trigger that will start the automation flow. A trigger is the event that causes the flow to start when a contact meets the selected criteria.
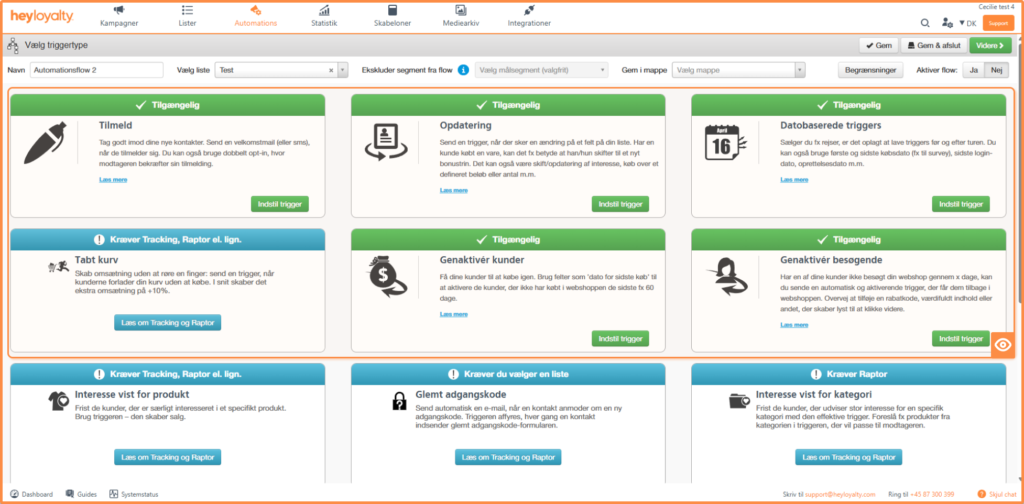
With a Basic license, you can choose from the following triggers:
- Sign-up trigger: Starts the automation flow when a contact signs up for the list in Heyloyalty. You can read here how to set up a welcome flow.
- Update trigger: Starts the automation flow when a specific field or any field on the contact is updated.
For example, you can start a flow when:- A field is set to a specific value
- The content of a field is changed regardless of the value it is assigned
- Date-based trigger: Starts the automation flow based on a standard or custom date field. Here are some examples below:
- Send an email on the contact’s birthday using the ” Date of Birth” field.
- Send an email 7 days after the contact was created, using the ” Created” field.
- Send an email 30 days after the last purchase date.
- Send an email 14 days before the subscription expiration date.
- Forgotten Password: Triggers the automation flow when a contact requests a new password via a reset form. Read here to learn how to set it up.
- Birthdays and Special Occasions: Triggers the automation flow on a specific special occasion, such as a contact’s birthday. Read here to learn how to set up the flow.
Select a trigger with a premium license
With a Premium license, you have access to all the triggers available with a Basic license, as well as a number of additional triggers based on the tracking behavior of the contacts.
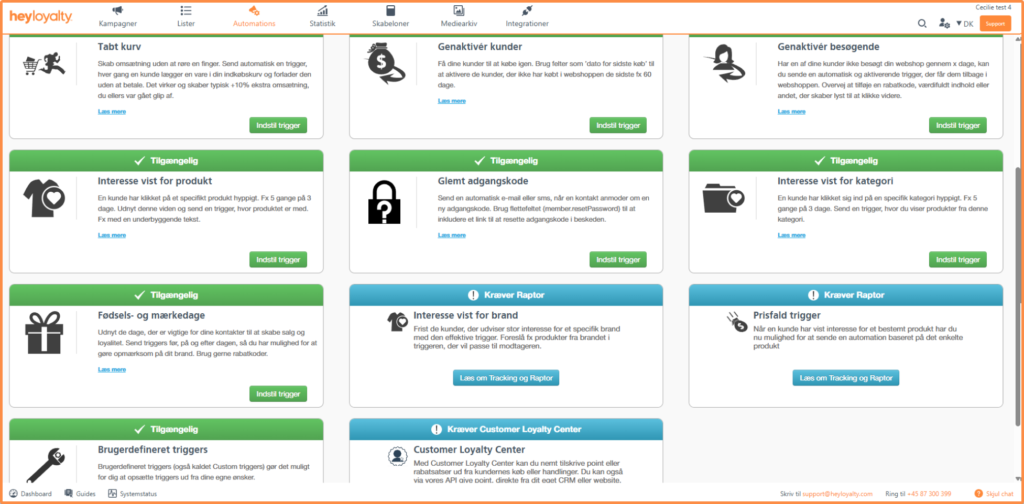
You can choose from the following Premium triggers:
- Abandoned Cart: Triggers the automation flow when a contact adds one or more products to the cart but does not complete the purchase. The contact receives a message listing the products left in the cart, along with an option to return to the online store and complete the purchase. An abandoned cart message is sent when the session period configured in your tracking integration has expired. Read here to learn how to set up an abandoned cart workflow.
- Re-engage Customers: Starts the automation flow a specific number of days after a contact has made a purchase. Use this trigger if you want to encourage past customers to shop again. Read here to learn how to set up the workflow.
- Re-engage Visitors: Starts the automation flow a specific number of days after a contact has visited your website. Use this trigger if you want to encourage the contact to visit the website again. Read here to learn how to set up the workflow.
- Interest in a product: Starts the automation flow when a contact has viewed the same product a certain number of times within seven days. Use this trigger if you want to remind the contact about the product or encourage a purchase. Read here to learn how to set up the workflow.
- Interest shown in category: Starts the automation flow when a contact has visited a specific product category a certain number of times. Use this trigger if you want to highlight products from that category. Read here to learn how to set up the workflow.
Once you’ve selected the desired trigger, you can continue with the setup. If you don’t want to restrict which contacts can enter the automation flow, you can proceed. You can read more about the restriction settings in the next section.
Step 3: Limitations
If you want to restrict when the automation flow can send messages, click ” Restrictions.” If you don’t need to set up any restrictions, you can skip this section.
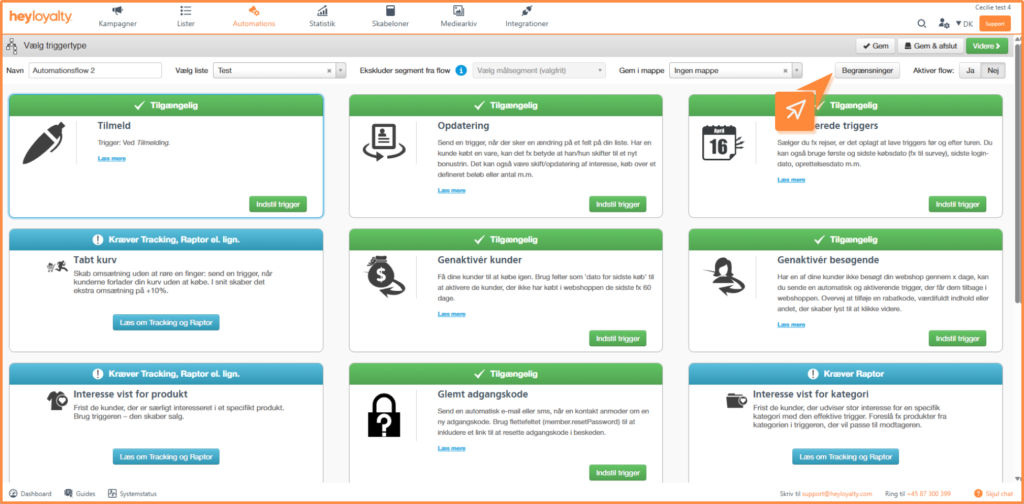
You can configure the following settings:
- Start and end dates: Specify the period during which the automation flow may be active.
- If you select ” Exact Date,” the automation flow will run only once during the selected date range. Therefore, the flow will not automatically repeat the following year.
- If you select ” Period,” the date range will be repeated every year.
- Blackout Period for Sending: This setting is particularly relevant for date-based triggers. By default, Heyloyalty sends messages at midnight on the selected date. If you want to avoid this, you can specify a time period during which messages should not be sent. For example, if you specify 8:00 PM to 10:00 AM, the message will not be sent until after 10:00 AM on the specified date.
- Limit Send Frequency: If a contact can trigger the automation flow multiple times in a short period, you can specify a minimum interval between sends. Enter the minimum number of hours that must elapse before the same contact can receive another message from the automation flow.
- Restrict by days: Select the days of the week on which the automation flow should not send out messages. (Ask JT if this is correct)
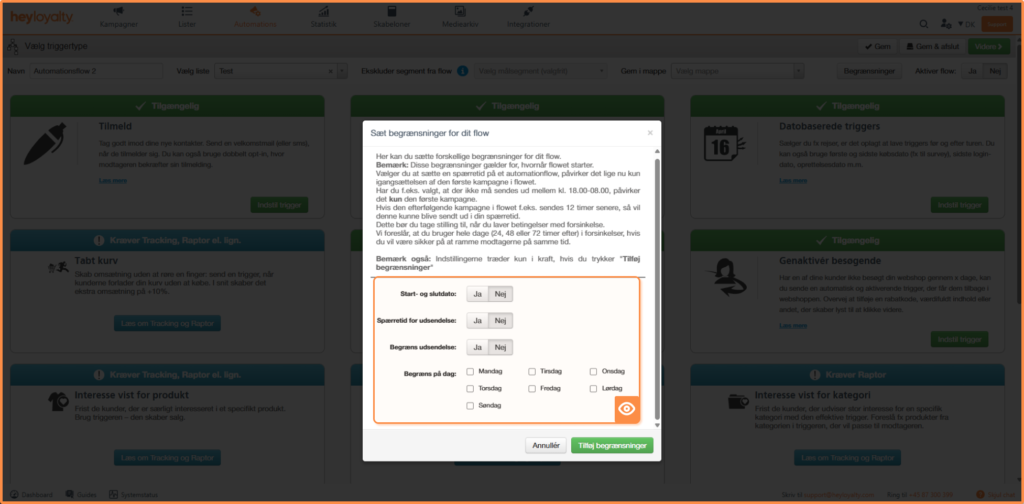
Step 4: Build Your Automation Flow
You have now configured the basic settings for the automation flow. The next step is to build the flow itself in Flow Builder, where you’ll put together the actions and conditions that the contacts will go through.
At the top of the workspace, you can always see the trigger you selected in Step 1. In the top-left corner, you can see which list the automation flow is associated with.
If you want to work with a different list, you can change it under the flow’s Settings.
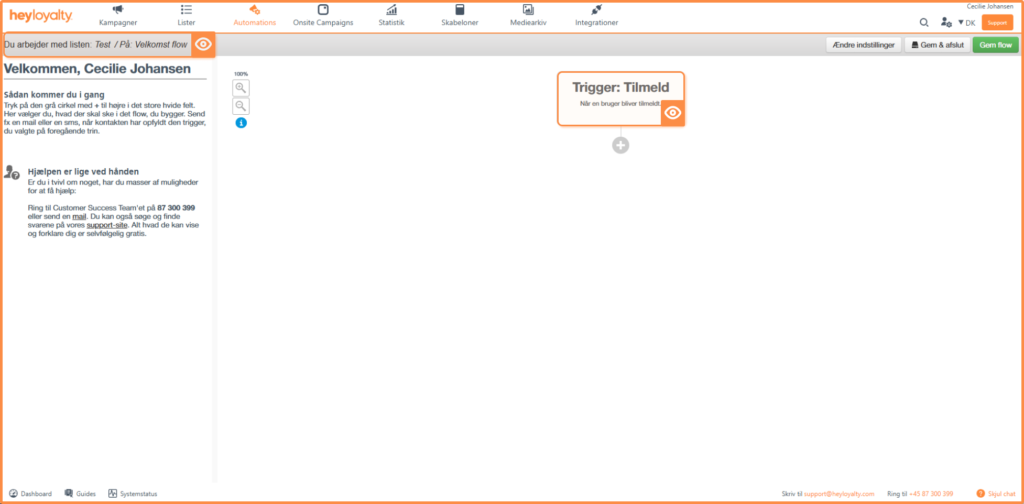
Click + to add a new item to the automation flow:
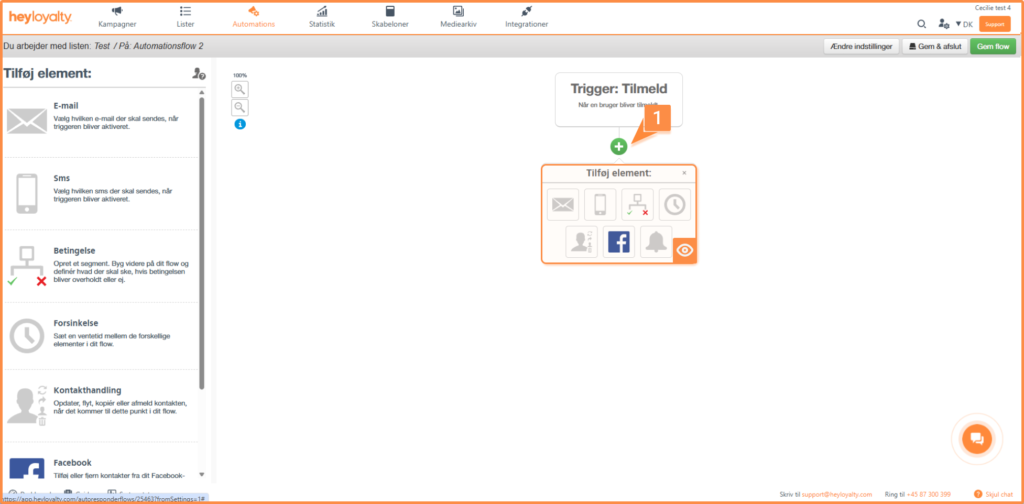
The various elements you can add are discussed in the following sections.
Add an email address
If you select “Email,” you must first configure the general settings.
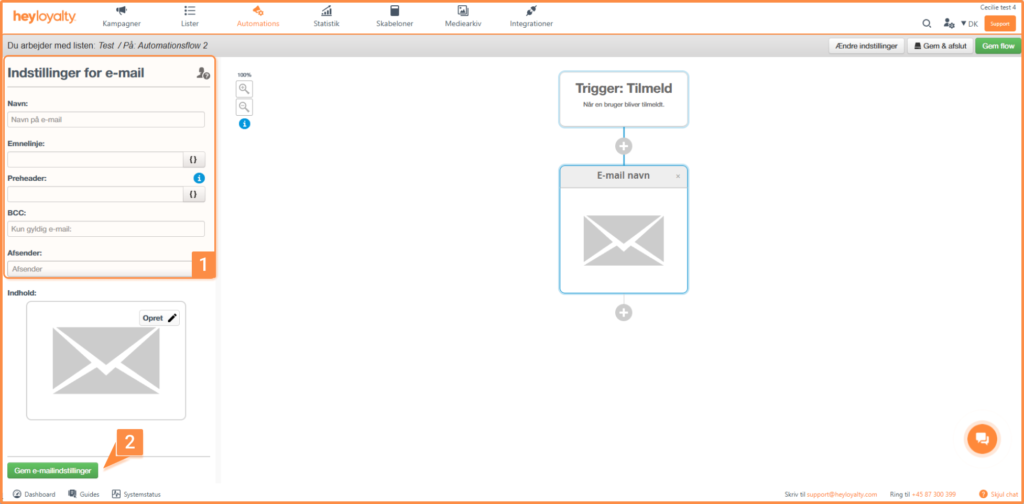
Please fill in the following fields:
- Name: Enter an internal name for the email. The name will appear in the overview in Flow Builder.
- Subject line: Enter the subject line that the recipient will see in their email client.
- Preheader: Enter a short teaser that will appear alongside the subject line in the recipient’s email client. The preheader provides the recipient with a brief description of the email’s content.
- BCC: Enter an internal email address if you want a copy of the email to be sent every time one of your contacts receives the flow. This feature can be used to ensure better internal communication. This can be particularly useful in situations such as seminar registrations or emails regarding reports in an external system.
- From: Select the sender you want to appear in the email.
Once you’ve filled in the fields, click Save Email Settings.
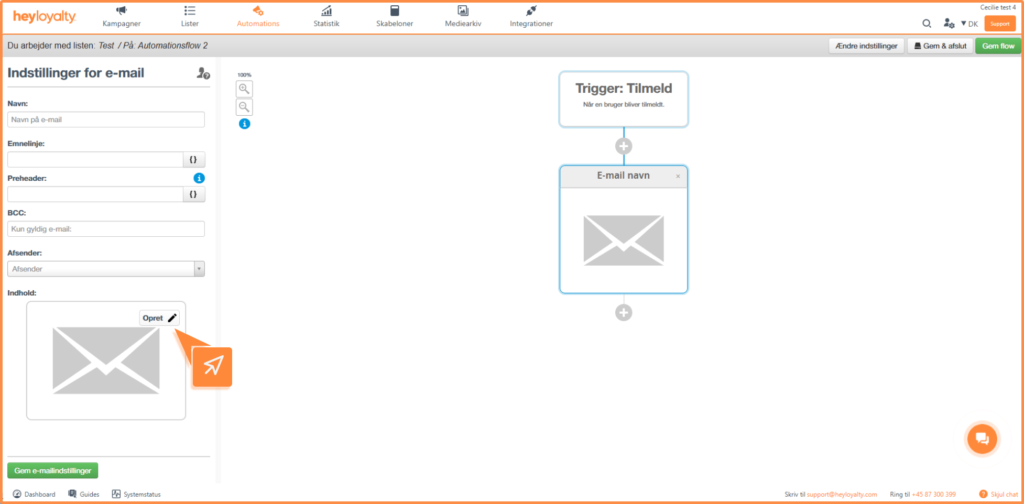
Once the settings have been saved, you can compose the email by clicking ” Create.” You can read here how to set up your email.
Add an SMS
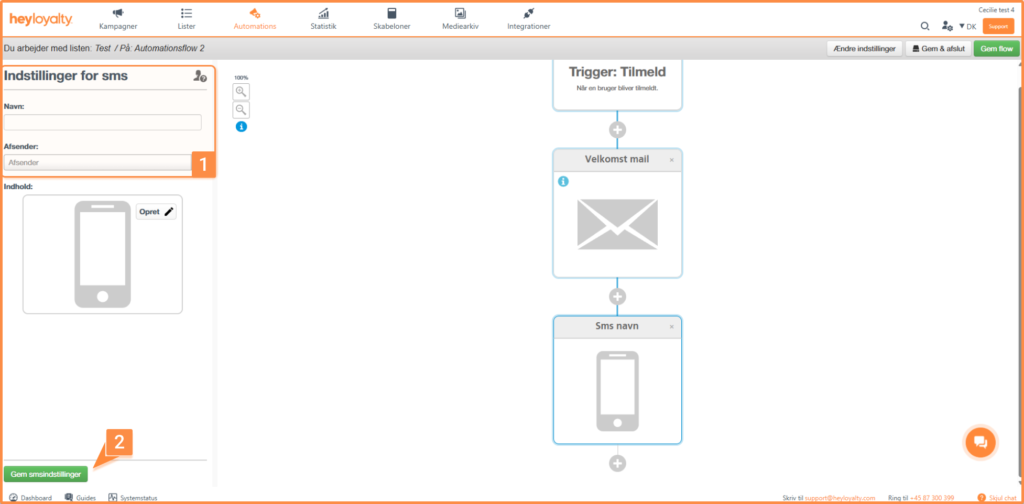
If you choose SMS, you must first configure the general settings.
Please fill in the following fields:
- Name: Enter an internal name for the SMS. The name will appear in the overview in Flow Builder.
- Sender: Select the sender you want to appear as the sender of the text message.
Once you’ve filled in the fields, click ” Save SMS Settings.” You can then create the message by clicking ” Create ” on the image of the cell phone.
Add a condition
If you want to split the automation flow into different paths, add the ” Condition” element.
A condition splits the flow into two branches:
- ✕ (No), if the contact does not meet the condition.
- ✓ (Yes), if the contact meets the condition.
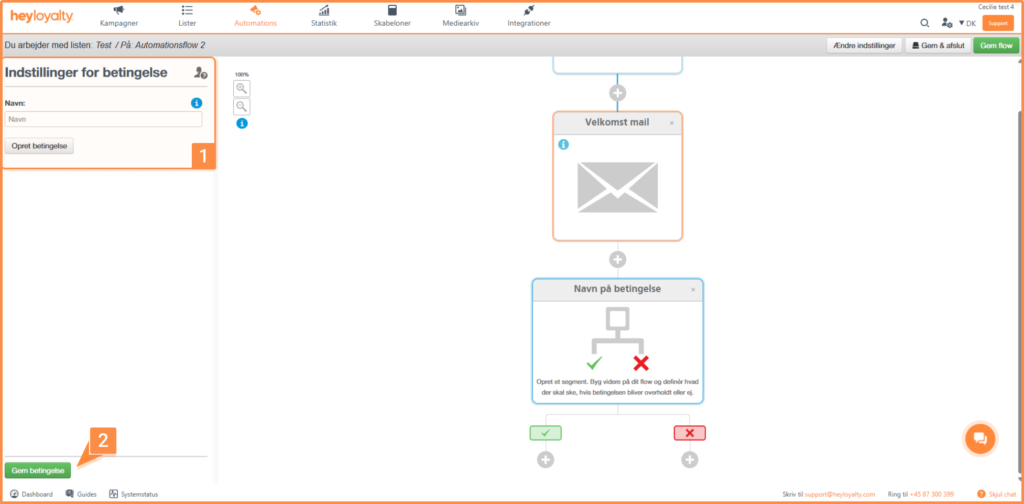
First, enter an internal name for the condition, and then click Create Condition. You will now be taken to Segment Builder, where you create the condition in the same way as you would a segment. Read here to learn how to create a segment. Once you have created the condition, click Next to return to Flow Builder. Finish by clicking Save Conditions.
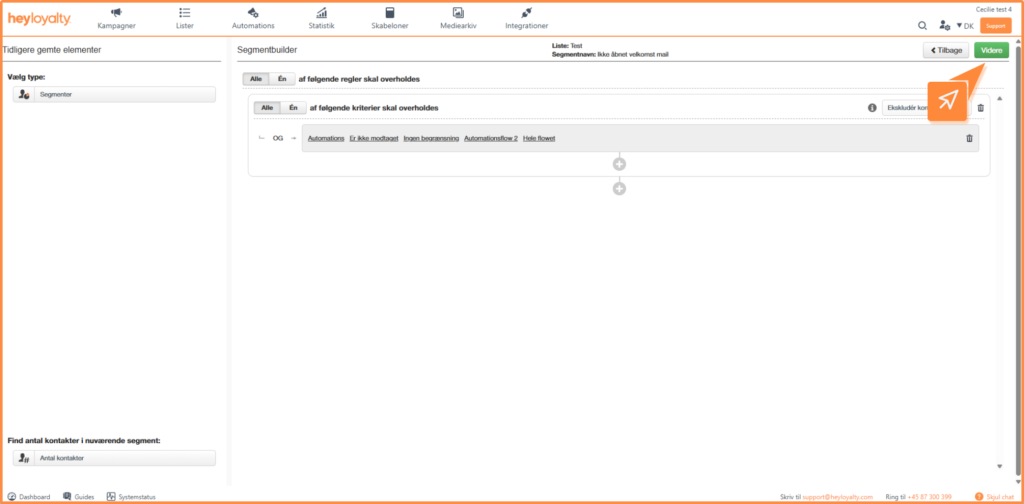
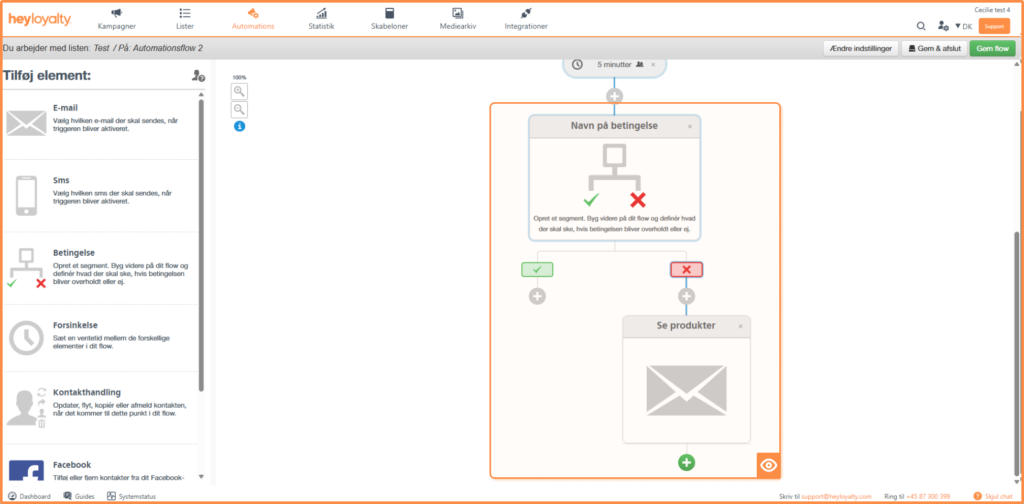
Example of a condition
For example, you can create a condition that checks whether a contact has opened the first welcome email in the flow.
- If so, nothing else should happen in the workflow if the email hasn’t been opened.
- If not, you can send a follow-up email or text message. (See example below.)
Waiting time
If you want a specific amount of time to elapse before the next action in the automation flow is performed, you can add a Wait. First, select the desired time format—such as minutes, hours, or days—and then specify the desired duration.
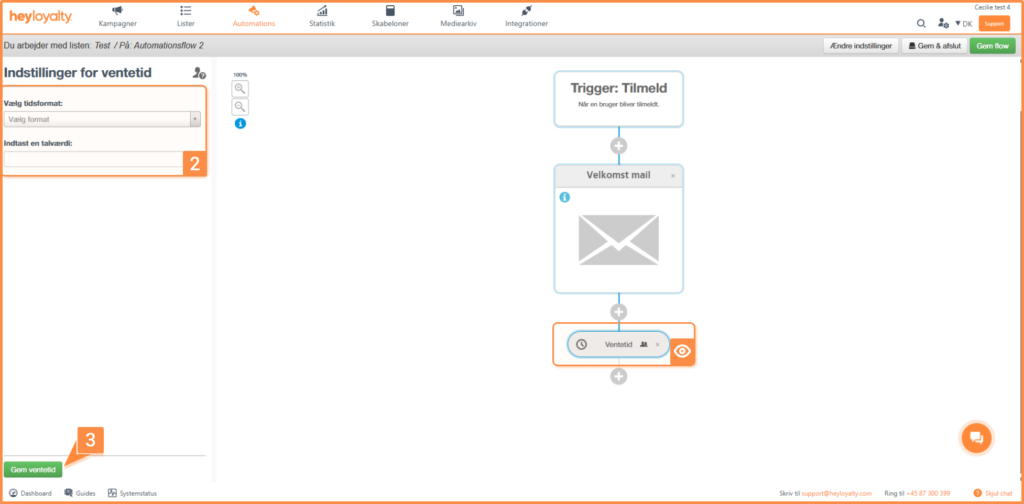
After you’ve entered the wait time, click ” Save Wait Time.”
View contacts while waiting
When the automation flow is active, you can see which contacts are in a waiting state. Click the person icon to open a list of the contacts waiting to proceed to the next step in the flow.
Interaction
If you want to perform an action on a contact that is going through the automation flow, add the Contact Action element.
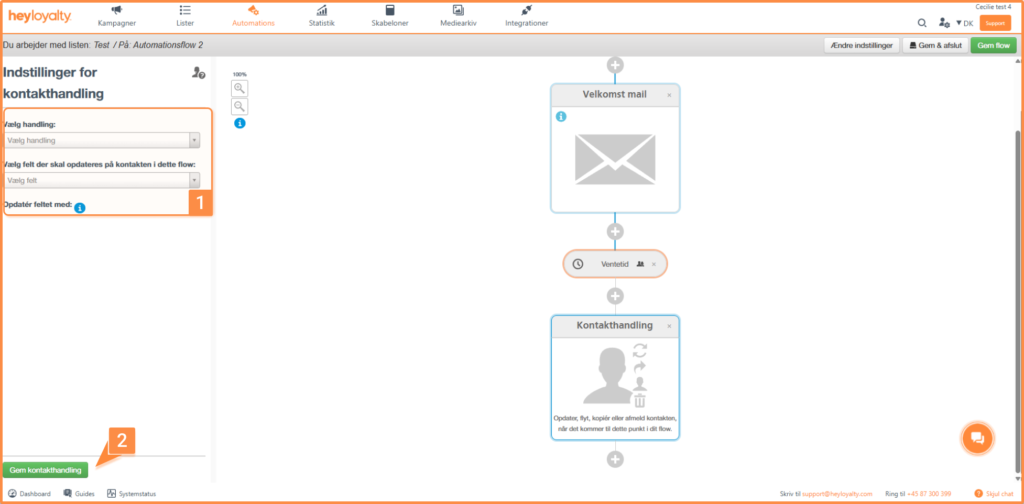
You can choose from the following options:
- Update Contact: Update a field in the current list for the contact going through the flow. Select the field to update and enter the new value.
- Update on another list: The contact that passes through the workflow can be updated with a field from another list or from both lists.
- Move Contact: Move the contact to another list. This action is often used as the final step in an automation flow.
- Copy Contact: Create a copy of the contact in another list.
- Remove contact: Remove the contact from the current list.
Once you have configured the desired action, click Save Contact Action.
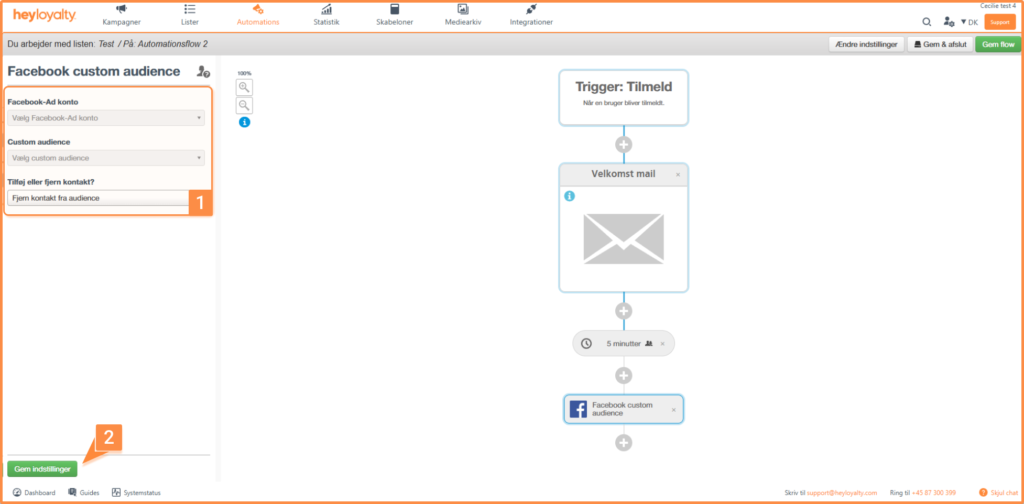
Facebook Customer Audience
If a Meta integration is set up on the list to which the automation flow is linked, you can add a Facebook element to the flow. This element is used to perform actions related to your Meta integration as part of the automation flow. You can read here to learn how to use this element in a flow.
Notification
If you want to receive a notification when a contact reaches a specific point in the automation flow, you can add the ” Notification” element.
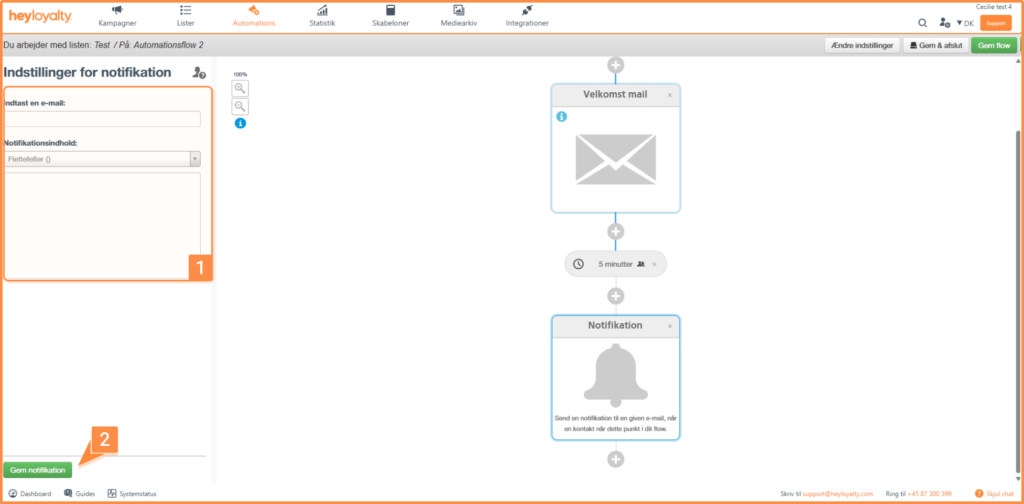
Enter the email address that should receive the notification, and enter the subject and the body of the message. For example, you can insert a merge field for the contact’s email address so that the notification shows which contact has reached that point in the flow. Read about merge fields here.
When you’re done with the setup, click ” Save Notifications.”
Step 5: Save the flow
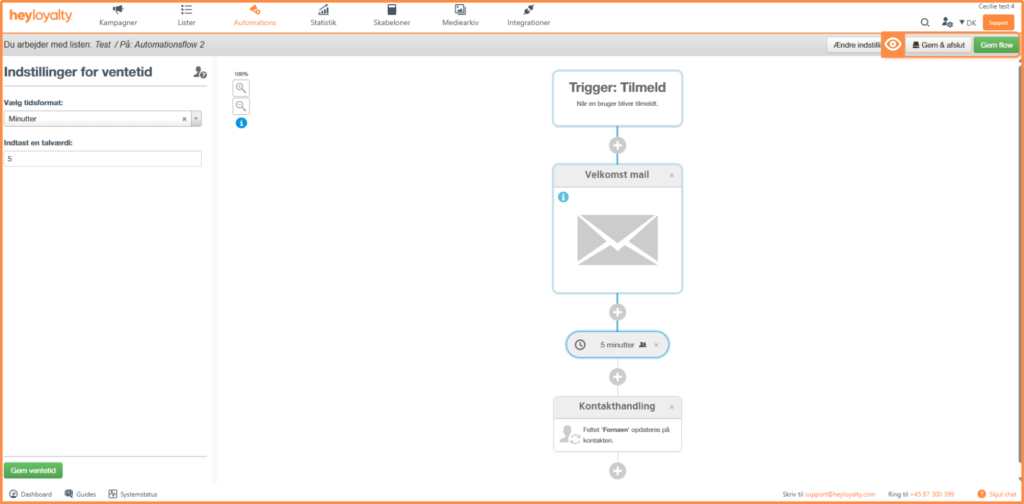
Once you’ve built the automation flow and configured all the desired elements, you’re ready to save your changes.
You have two options:
- Save flow: Saves the automation flow so you can continue working in Flow Builder.
- Save & Close: Saves the automation flow and takes you back to the automation overview.
Edit Flow
To edit an existing automation flow, go to Automations.
There are two ways to open the flow:
- Click ⋯ next to the automation flow, and select Edit Automation.
- Click the name of the automation flow.
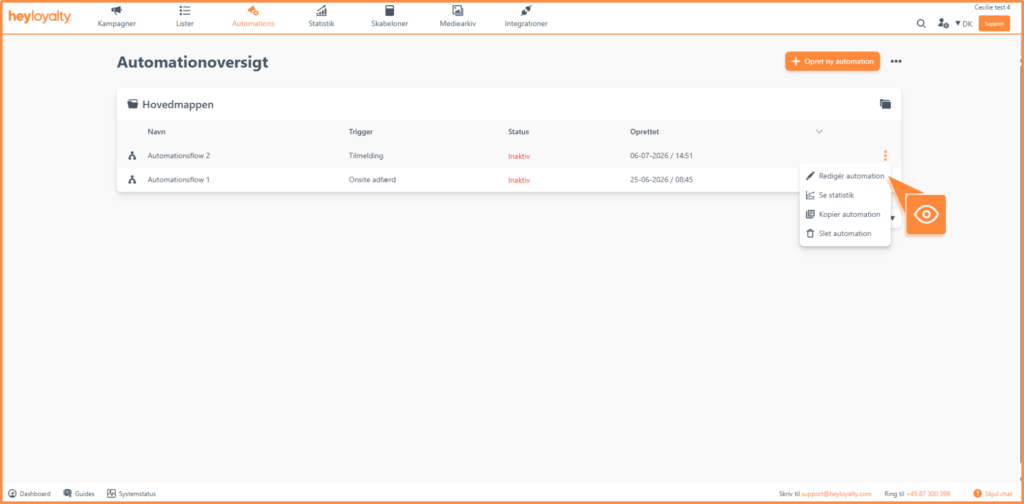
You now have full access to edit all elements in your flow.
Once the flow is open, you can edit all elements and settings in Flow Builder.
If you want to change the trigger or the general settings for the automation flow, click ” Change Settings.” This will take you back to the settings page, where you can change the trigger as described in the section Select a Trigger.
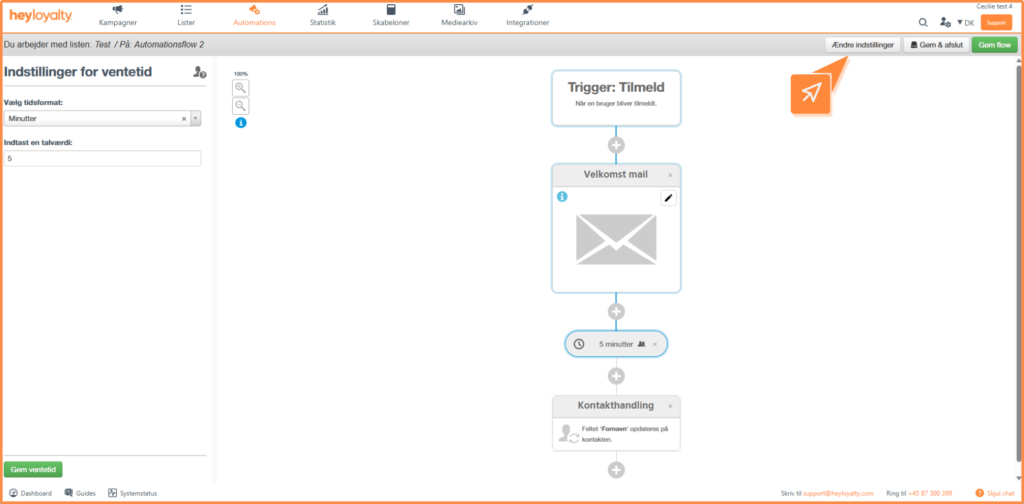
Enabling the automation flow
On the automation flow overview page, you can enable or disable a flow. To do this, click the “Enabled” or “Disabled” status. A pop-up will then appear, asking you to confirm whether you want to enable or disable the flow.
Below, you can learn what the different statuses mean:
- Inactive: When an automation flow is set to inactive, it does nothing (and sends neither emails nor text messages). You can use this setting both while you’re creating the flow and if you want it to be inactive for a period of time (or simply want to save it for future reference).
- Active: The automation flow that is active is always ready to be “triggered”—based on the condition set up in the flow’s settings.
Automation Flow Statistics
You can’t view aggregate statistics for the entire automation flow, but you can view the statistics for each individual email in the flow.
Go to Automations and open the statistics in one of the following ways:
- Click the name of the automation flow.
- Click ⋯ next to the automation flow, and select View Statistics.
Hover your mouse over the email for which you want to view statistics, and then click the statistics icon.
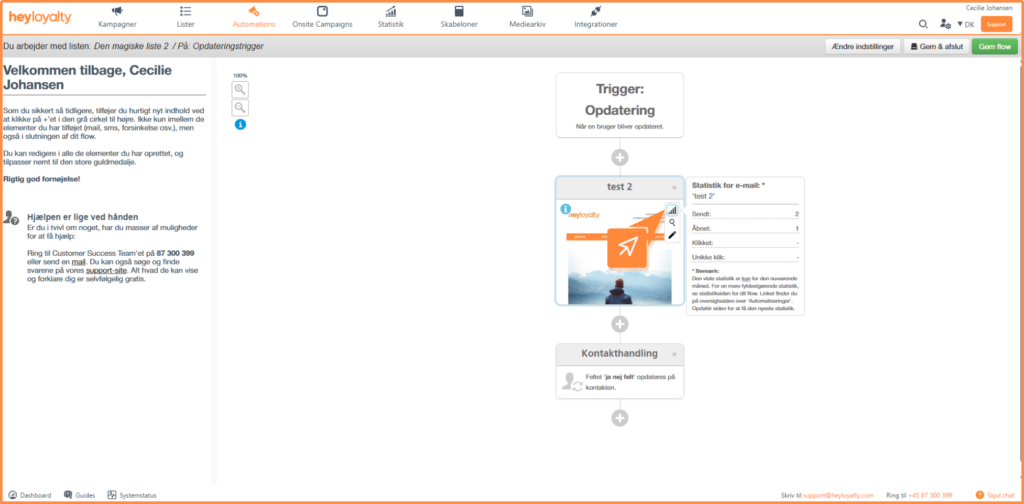
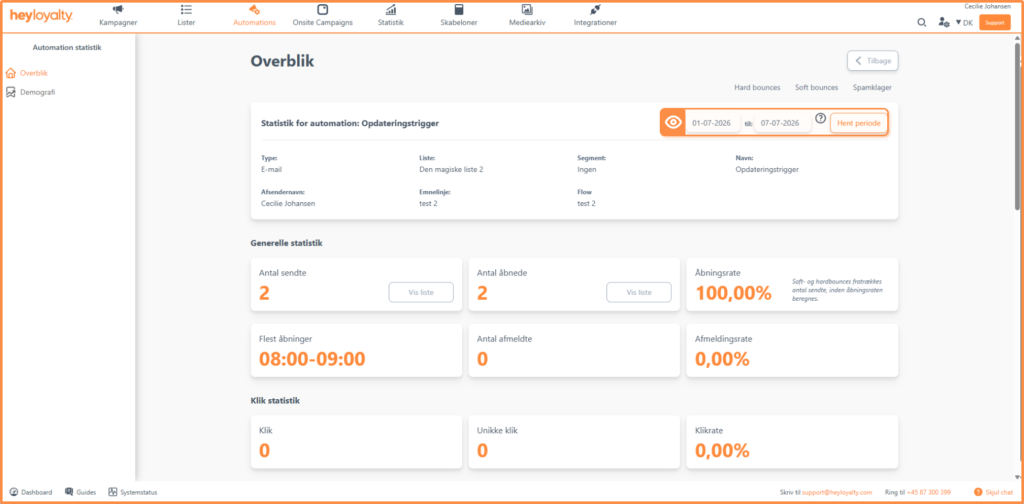
You will now see an overview of the email’s statistics, such as who the email was sent to. Be sure to select the date range for which you want to view statistics.
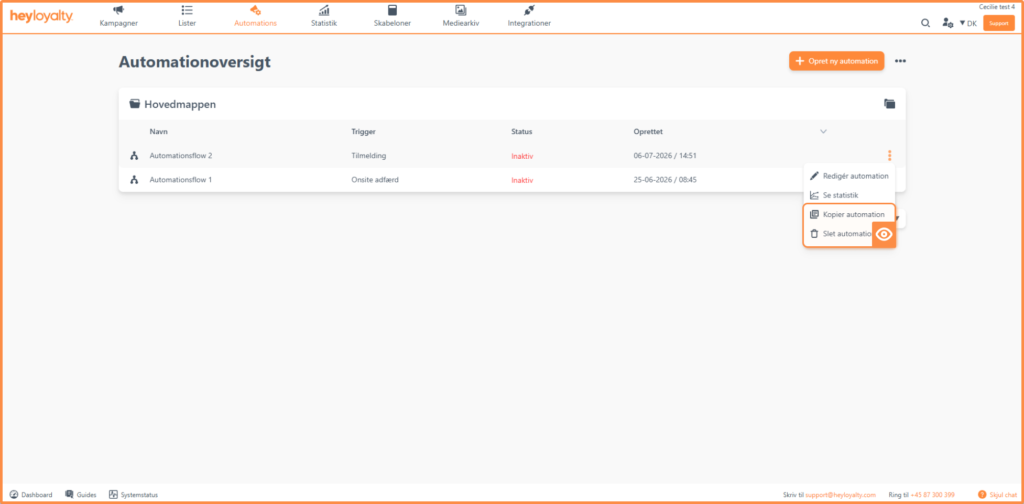
Copy or delete an automation flow
You can copy or delete an automation flow at any time.
Go to Automations, and click ⋯ next to the automation flow you want to manage.
Here are your options:
- Delete the automation to remove the automation flow.
- Copy the automation to create a copy of the automation flow.
You are now ready to use automation flows
You have now learned how to create, build, and manage an automation flow in Heyloyalty. You know how to select the right trigger, add elements such as emails, text messages, wait times, and conditions, as well as edit and track the flow’s statistics.
Once your automation flow is complete, we recommend that you review the setup and test the flow before activating it. This way, you can ensure that all actions are performed as expected and that your contacts have the desired experience.
You can always go back and customize the automation flow if your needs change or if you want to expand it with additional actions and conditions.