
Ready to give your email marketing a boost with Heyloyalty tracking? In this guide, we’ll walk you through what it takes to get started with tracking on your website.
The value of tracking
More personalized communication
Tracking makes it possible to collect data about customer behavior on your online store so you can send more relevant and personalized messages based on their interests, product views and purchase history.
Automation based on behavior
Once tracking is implemented, you can enable automatic flows such as lost basket, product interest and category triggers. This makes it possible to automatically respond to customer actions and create more valuable customer experiences.
Better segmentation
Tracking data provides a stronger data foundation for segmentation. You can build audiences based on behavior, categories visited, product interests and purchases to make your campaigns more targeted and relevant.
Increased conversion
By working with behavioral marketing, you can target customers at the right time with the right message. This can help increase engagement, conversions and repeat purchases.
Insight into customer behavior
Tracking gives you insight into how customers move around your webshop. Through Heyloyalty’s Insight and Activity feed, you can see which products and categories are most visited and use that knowledge to optimize your communication and marketing.
A stronger data foundation in Heyloyalty
When tracking is set up correctly, Heyloyalty’s data warehouse is continuously enriched with behavioral data from your website. This provides a stronger foundation for automations, segmentation and analytics across the customer journey.
Tracking is therefore a central part of working data-driven with email marketing and automated communication at Heyloyalty.
Step 1 – Create tracking integration
Set up Tracking by clicking on Integrations –> List Integrations –> Tracking –> Setup Integration –> Create new Tracking
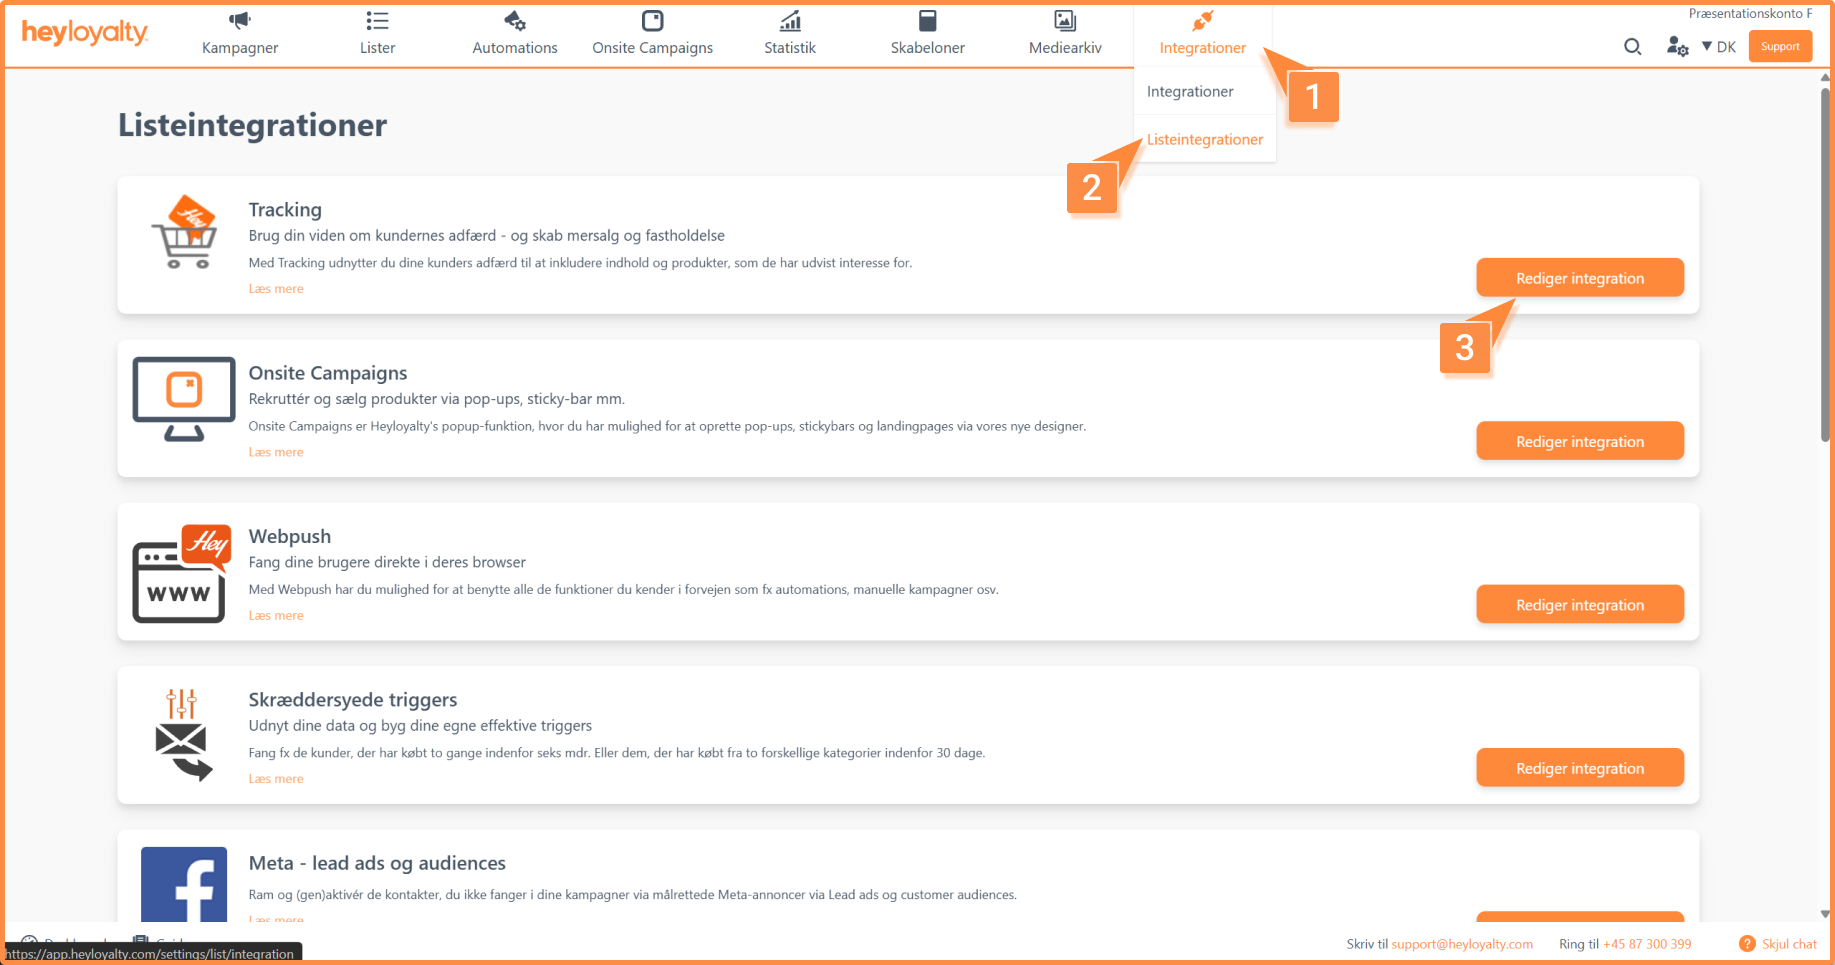
Here you will be greeted by the integration page where you need to set various settings, as you can see in the image below:
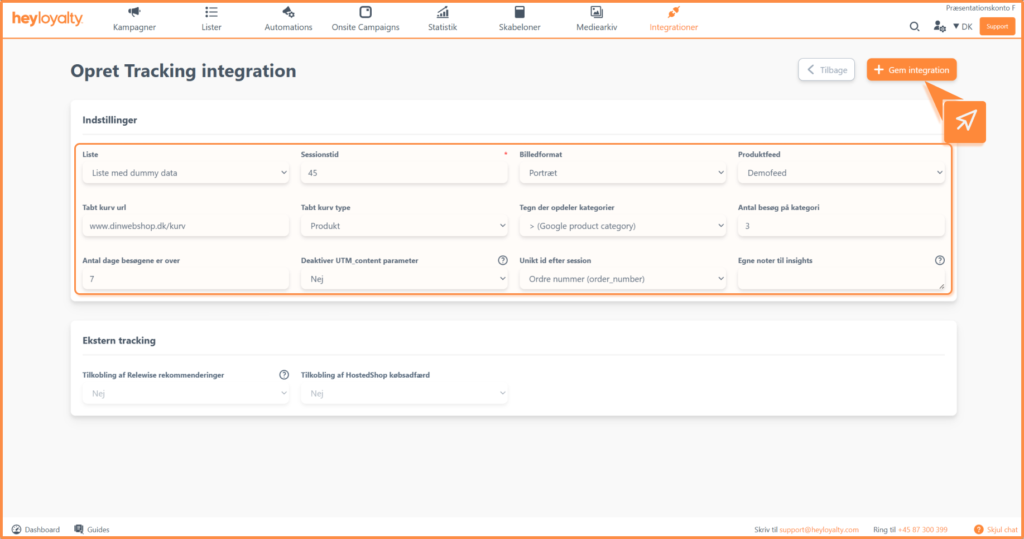
You can read here what the different fields/settings mean:
- List: Select which list to associate the integration with. Tracking will only be applied to the list selected in the integration.
- Session time: Must be a number, and it must be the same as in your script. Typically, we recommend 45 minutes, so if you follow that recommendation, enter 45 in that field. Also select a product feed to associate with the integration.
- Image format: Choose the format of your product images. If in doubt, leave it on portrait. The image format is used, among other things, to set up a lost basket.
- Product feed: Choose which feed the integration should use. Among other things, this determines which products your tracking takes data from
- Lost basket type: There are two options here:
- Lost basket ID: In most cases, you should select this option as most online stores support unique basket IDs in the URL. Your online shop will generate a unique link to the lost cart, for example:www.dinURL.dk/basket/?basketnumber=29fSc-df2s. In the example above, a unique basket ID is inserted after
=. Heyloyalty uses this ID to recreate the customer’s cart. - Product: If your online store doesn’t support lost cart ID, the cart can instead be recreated via product parameters in the URL. This is done by adding product information to the lost cart URL, for example:
www.dinURL.dk/?ProductID=154Ds&amount=1&productID=98DWC&amount=3
In the example above, two products have been added to the URL. Each product contains:- productID = product ID
- amount = quantity of the product in the basket
- Lost basket ID: In most cases, you should select this option as most online stores support unique basket IDs in the URL. Your online shop will generate a unique link to the lost cart, for example:www.dinURL.dk/basket/?basketnumber=29fSc-df2s. In the example above, a unique basket ID is inserted after
- Lost cart url: Here you insert the URL for the basket on your online shop. It will often be something like: www.dinwebshop.dk/kurv or www.webshop.dk/basket.
- Sign dividing categories: Refers to your product feed, so how are the categories divided in your product feed. If you don’t have categories in your product feed, you can set the setting to None.
If you have selected a Google Shopping Feed, select > (Google product category). Find the right format in your product feed. - Number of visits to category: Specify how many times a member must visit a category before a category interest automation is triggered.
- Number of days the visits are over: Specify how many days the visits should be distributed over to trigger a category interest automation.
- Disable UTM_content parameter: If you want to use our default, set the setting to no. If you want to control your utm_content parameter via your custom content template, you should select ‘Yes’ to disable utm_content.
- Unique ID by session: When a session ends with a purchase, Heyloyalty needs a unique ID to recognize the purchase. For most, this will be the order_number.
If you use a different ID to recognize purchases, such as booking ID, select the appropriate option. If the ID has a different name, select Other and enter the field name.
Once all the above settings are set up, you can save the integration.
Step 2 – Implement Tracking on the webshop
For tracking to work on your webshop, data must be sent to Heyloyalty. This is done by implementing a JavaScript that sends tracking data to Heyloyalty.
Implementation is often done by a developer or IT manager. You can find our tracking documentation here.
Implement tracking script on the webshop
You can find the tracking script here. We recommend inserting the script on all pages of the webshop. Therefore, it often makes sense to place it in either the header or footer.
To implement the script, you need to insert some parameters in the script. Which are marked in the image:
- API key: Found under Account details in your Heyloyalty account
- Session time: Is the value you selected when setting up the tracking integration. Found under List integration → Tracking.
- Tracking ID: Found under List integration → Tracking. Used if the tracking should only apply to one specific list.
If the tracking is to apply to multiple lists, the field must be empty.
Step 3: Fire events from the right webshop sites
If your Heyloyalty integration does not automatically fire the triggers below, you can add them yourself on the webshop.
If you can already see events in the Activity Feed in Heyloyalty, you can skip this section.
Events should be placed within a <script> tag, which could be the same script as above. Add events to the relevant pages in the webshop and make sure that each event is only fired from the correct page.
Available events
- hlt.visit(PRODUCTID, CATEGORYID, CATEGORYNAME, VARIANT) – Fired from all pages except “thanks for the purchase”. Used on product pages, category pages, blog posts etc. You can read more about visit events in our documentation here.
- hlt.addToBasket(PRODUCTTID, AMOUNT, CATEGORYID, BASKETTID, CATEGORYNAME, VARIANT) – Fired from the cart page or from each “add to cart” button. You can read more about addTo events in our documentation here.
- hlt.updateBasket – Used if the number of products in the basket changes. You can read more about update events in our documentation here.
- hlt.removeFromBasket(PRODUCTID) – Fired when a product is removed from the basket. You can read more about remove events in our documentation here.
- hlt.purchasedBasket(BASKETPRICE, ORDERNUMBER) – Fired from the “thank you for your purchase” page after the purchase is complete. You can read more about purchased here.
- hlt.pairEmail(EMAIL) – Optional, pairs email directly from sign-up/sign-in form. You can read more about this here.
- hlt.pairPhone(“PHONENUMBER”) – Optional, pairs the phone number with the session in the tracking. You can read more about this here.
Pairing directly from a signup/login form
To track which contacts perform the different actions on your website, you need to make sure that the contact is paired. When implementing tracking, you can add the pairEmail eventon your own forms or use the extended script to ensure Heyloyalty forms pair customers instantly.
You can read here how to use our extended tracking script, where the pairing is inserted in the script.
We use a pair-on-click from every email or SMS sent from Heyloyalty. Every time a customer clicks and is directed to your website, the pairEmail event is automatically triggered.
Setting up Tracking in connection with Multi-shop
If you have multiple webshops that need the same script but different tracking databases, use the script below. Remember to replace webshopnoX with your domains and integrationIDX with your integrations.
<script>
var currentDomain = window.location.hostname;
switch (currentDomain) {
  case 'webshopno1':
    trackingId = 'integrationID1';
    break;
  case 'webshopno2':
    trackingId = 'integrationID2';
    break;
  case 'webshopno3':
    trackingId = 'integrationID3';
    break;
  default:
    trackingId = 'integrationID1';
}
</script>
<script type="text/javascript" language="javascript">
var hlt;
var BiTrackingLoaded = function (BiTracking) {
  hlt = BiTracking;
  BiTracking.initialize('INSERTAPIKEYHERE', INSERTSESSIONTIMEHERE, String(trackingId));
  hlt.visit("PRODUCTID", "CATEGORYID", "CATEGORYNAME");
}
</script>
<script>
(function (d, t) {
  var g = d.createElement(t),
      s = d.getElementsByTagName(t)[0];
  h = "https:" == document.location.protocol ? "https://" : "http://";
  g.src = h + 'tracking.heycommerce.dk/hlbi.js';
  s.parentNode.insertBefore(g, s);
}(document, 'script'));
</script>
You are ready to use Tracking
You have now activated Tracking, implemented the script on your webshop and set up the list-level integration in Heyloyalty. This means that you can now track your members’ behavior and use data such as visited categories, lost baskets and product interests actively in your email marketing.
The next step is to start using the many tracking triggers. They are used in our automation flow – for example, a lost basket flow or a category interest automation that sends relevant emails based on your customers’ actual behavior. Have a great experience!
Hvis du mangler information eller hjælp, som du ikke finder her på guide sitet, er du altid velkommen til at kontakte vores support!
support@heyloyalty.com / tlf. 87 300 399